Smalti
- Filati Technique
Written by Rochelle, April 2011
Smalti
Smalti is a type of glass paste,
(sometimes it is translated as enamel), that was developed centuries
ago to enhance, and then ultimately take precedence over colored marble in
mosaics.
Today, the dominant producers of smalti are all family owned businesses:
Orsoni (Venice, Italy), Dona (Murano & Spilambergo, Italy), and Perdomo
(Cuernavaca, Mexico).
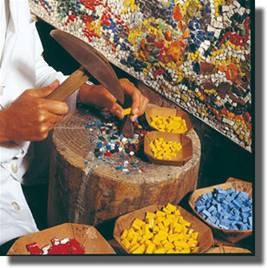
It is hand made in small batches, each color poured and cooled in small
puddles, about 3/16” -1/4” in thickness.
In Italy they call these puddles of smalti “pizzas”. In Mexico, they are
called, not surprisingly, tortillas.
The Italian smalti is thicker, and is turned on its side where the richness
of the colors can be fully revealed.
Due to the air bubbles that naturally occur in Italian smalti, and also due
to tradition, one does not grout works made in Italian smalti as it settles
into the bubble holes and creates a horribly ugly surface – think bad skin
disease!
Mexican smalti can be used on its side or with either the top or bottom
surface facing up.
Mexican smalti, lacking the air bubbles that Italian version has, can be
grouted.
Cutting Smalti
Traditionally, smalti is cut
using a “hammer” and a “hardie”.
This tradition goes back to at least the 2nd century Roman era
(there is a bas relief sculpture showing artisans using these same tools).
|
As mentioned earlier, smalti slowly took over the tradition of using colored
marble in mosaics.
Smalti, being more of a glass paste, is not as brittle as the glass most
people today are familiar with.
Therefore, as the mosaic materials changed from marble to smalti, the
method and tools of cutting tessare did not change, and thus a complete
re-tooling of the ancient mosaic industry was averted.
Henry Ford himself would have been impressed!
In my micro mosaics that are not
made with filati, I use the hammer and hardie to cut my class.
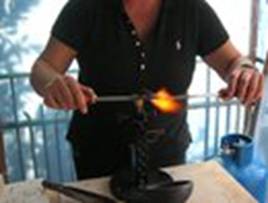
Filati
Filati is typically made from smalti, rather than other glass.
It is different from other rods in that, again, it is handmade, with each
pull resulting in a unique color, never repeated.
The artist can customize the filati as she/he sees fit.
Traditionally, filati was made to create micro-mosaics.
The Vatican took a keen interest in the development of filati to replace
all of the paintings, save one,
in the nave of St. Peter’s Basilica in Rome (the heat and humidity began to
rot the masterpiece paintings, all of which were replaced by exact replicas
in micro mosaic that are so perfect, most visitors fail to realize they are
looking at mosaics rather than paintings).
As the fashionable and polite society of the mid-1600’s through the
mid-1800’s sent their “20 somethings” on a Grand European Tour, the demand
for souvenirs (micro mosaic jewelry and snuff boxes being the most popular),
grew immensely. In the earlier days, one would create an image using single
colored filati, typically in a simple lozenge shape, to painstakingly create
delicate and elaborate imagery on a very small scale.
Usually the images were based on tourist sites, for instance the Coliseum.
As the demand for these increased, methods were developed to speed up the
production.
Still all handmade and pulled, artisans began using what in Italian is
called “malmisticato” – or “badly mixed”.
This approach would blend more than one color together, creating a marbled
effect in each rod.
And, in addition to the small lozenge shapes, filati would be made into
circular, square, rectangular, tear drop, leaf
and c-shapes.
Again, as the desire for more realistic and exquisite imagery increased,
artists could now use, for instance, a malmisticato filato in the shape of
the letter “c” and use it to mimic the hair of a person or the fur of dog –
one piece of glass rather than the 10 or so pieces it used to require.
Traditionally, the filati would be between 1 and 3 mm in size. In my work,
I tend to stretch the limits of size – at times going as small as a thread.
Also, traditionally once the filati have all been set and the adhesive
dried, the micro mosaic would be ground down to create a very smooth
surface. In my work, I prefer the rough edges which reflect and refract
light in such a delightful manner that I cannot imagine grinding that all
away!
Adhesives and Supports
The traditional adhesive used in
ancient mosaics was a mixture very much like our modern cement. As mosaics
became more refined, they required smaller tessare, and therefore an
adhesive that wasn’t as clumsy as cement. For micro mosaics, artisans would
create a “stucco” from powdered marble, lime, and linseed oil. They would
blend, and knead these ingredients into a paste, and then store it in a
wooden box for 1-10 years (!!), until it was fully dry. Then they would
chip out a chunk, grind it down and add linseed oil to create the perfect
consistency for the filati to be supported. Needless to say, ancient and
Romantic timelines are very different from our modern demands! Usually I
use window putty to place my filati in – it is remarkably similar to the
texture and consistency as the traditional stucco. This time-saving “trick”
was passed on to me from the masters in Italy working in micro mosaic where
I was trained.
Traditional supports for filati
were shallow boxes made of marble, granite, ceramic, glass or fine metals.
Today, many micro-mosaics use a wooden or metal support. I use wood or
silver.
In the mosaics where I did not
use filati, my supports are wood, painted black. The adhesive is clear
silicone.
|